| |
Chapter 9
Dynamic Property Checking
Structural Testing
The verification techniques that have been described so far in this manual have focused on checking how much of the HDL code has been covered or exercised. This involved, in the case of Verilog or VHDL, applying various measurements to check the amount of statement, branch, condition, path and toggle coverage. An additional set of measurements, namely FSM state, FSM arc and FSM path as described in Chapter 8, can be used to verify designs containing finite state machines. These measurements collectively perform what is called structural testing or white box/open box testing. One of the primary objectives of structural testing, as mentioned in Chapter 6, is to raise the designer's confidence level that the HDL code does not contain any untested areas.
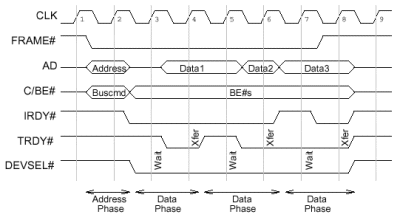
Although measuring how much of the HDL code has been covered is important, it does not verify that a design operates in a functionally correct manner. For example, consider the situation, in Figure 9-1, where a group of functionally related signals need to be checked to make sure their behavior matches the design's specification.
Some of the things a designer might want to check are:
So how does a designer check whether the results obtained from the simulation match the original specification for the design?
Visual Checking
Probably the oldest and most labour intensive technique is based on visually checking the simulation results against the formal specification. Clearly the success of this technique relies very much on the determination and dedication of the individual who is doing the checking. Also each time a change is made to the HDL code the same amount of effort needs to be deployed to check the simulation results all over again.
Self-Checking Test Benches
Another technique is to write a self-checking test bench that checks the actual results obtained from the simulation against the expected results. Although this technique can dramatically reduce the amount of effort needed to re-check a design after a change has been made to the HDL code, it does require considerably more effort during the initial test bench creation phase. For example, the designer needs to spend time working out what the results should be after certain test vectors have been applied to the design and then write a series of comparison tests. This can consume quite a lot of effort, as during the early phases when the self-checking test bench is being developed a designer may not be sure whether the test bench is inadequate (i.e. fails the comparison test for some reason) or the HDL model is not working correctly.
Pattern Matching
This technique relies on the ability to perform the following two tasks
1. Describe the original specification of the HDL design in some sort of language that can be handled by a computer.
Once the above information has been gathered a computer program can be used to automatically check and compare the above details. The pattern matching technique is attractive because once the design's specification has been captured the amount of effort needed to re-check the operation of the circuit after a change has been made is minimal.
Properties
The first thing to consider is how the design's specification can be described or captured. One of the most common method uses what are called properties that specifies the value on signal(s) at point(s) in time in relation to other signal(s). For example, a property could define that the state of signal `x' should be checked on each rising-edge of the main clock to see when it becomes a logic `1'. Once signal `x' becomes true the next property is then considered and checked. This property might define that signal `x' can remain in the logic `1' state for a maximum of up to 4 clocks before going to the logic `0' state. Once a set of properties have been written they can be grouped together to form the specification for a model.
Although at the time of producing this manual there is no recognized standard for writing properties, the Accellera Formal Verification Technical Committee has been created to develop and promote a property specification language compatible with both the Verilog (IEEE-1364) and VHDL (IEEE-1076) hardware description language standards. Further information regarding developments in this area can be found on Accellera's web site: www.accellera.org
The next part of this manual explores how the concept of using properties to check the behaviour of a circuit can be combined with code and FSM coverage to augment the coverage directed verification methodology that was described in Chapter 7.
Verification Flow
Up until this point the various coverage metrics that have been described in this manual have been treated as a series of separate tools each of which checks a certain aspect of the design. The technique of using properties to describe the behavior within a design can be used to tie the various coverage measurements together and thus form an effective and productive testing strategy. Figure 9-2 shows a flowchart of a testing strategy based on a coverage directed verification process using properties.
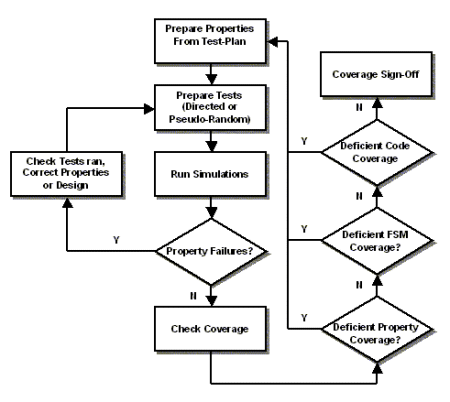
The strategy starts at the test planning stage where the various properties are identified that will be needed in order to show that the design behaves according to its original specification. These properties fall into two distinct sets called `expected behavior' and `prohibited behavior'. An example of a property describing an expected behavior is, "If A happens and B and C happens then D will happen." If this behavior is observed during the simulation then the property is reported as covered. It should be noted that dynamic property checking cannot formally prove these properties to be true: this will always be the case without exhaustive simulation. However, dynamic property checking does provide a measurable degree of confidence in their correctness.
An example of a property describing a prohibited behavior is, "A will never happen." If "A" happens during simulation, then the property is violated and proven false. A set of tests (which could be a directed set of tests or pseudo random tests) are prepared to check that all the properties have been exercised correctly during the simulation. Any failures that are detected at this stage could be attributed to an inaccuracy in the description of a property or an inadequacy in the design. This may mean re-checking the test plan to make sure the original property definitions have been correctly specified or carrying out further diagnostic work on how the design was implemented. In general property failures at this stage can be attributed to prohibited behavior that is not wanted occurring during the simulation.
The coverage checking phase is entered once there are no further property failures. This consists of three phases namely: dynamic property coverage, followed by FSM coverage and finally code coverage. Deficient property coverage at this stage can be traced to an expected behavior not being detected during the simulation of the design. To rectify this situation additional test vectors will be needed to ensure that the expected behavior occurs at least once during the simulation of the design.
When all property failures have been eradicated and all expected behaviors have been covered, the next thing to check is FSM coverage. The first thing to do is make sure that all the states and arcs of the key FSMs have been covered and then check that the main FSM paths have been exercised. Deficiencies in FSM coverage indicates gaps in the test plan, which should be filled by preparing more properties and tests. Once FSM coverage has reached an acceptable level the code coverage metrics should be checked. Again, any code coverage deficiencies indicate that the test plan should be revisited and more tests and properties prepared.
Coverage sign-off can take place once the user-specified sign-off criteria for each of the above three major coverage measuring methods has been achieved.
Dynamic Property Checking in Operation
Dynamic property checking can be divided into the following three distinct phases.
1. Analyze the details (i.e. signal names) that occur within the property definitions.
This information is used to compile a list of the signals that need to be traced during the simulation.
Collecting Simulation Results
Most Verilog and VHDL simulators have the capability of outputting the simulation results as a tabular trace file as well as or instead of a waveform diagram. Although the physical size of the file used to hold a waveform diagram can become excessively large, a tabular trace file is much smaller in comparison as the information is held in a very compact format.
As an example, consider the waveform diagram for the two signals shown in the figure below.
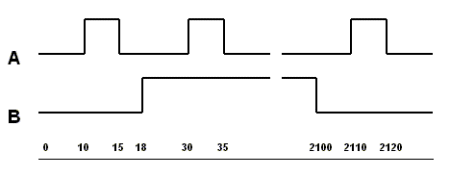
The activity for the two signals can be expressed in a very compact tabular format, as shown by Figure 9-4, by listing the times when either signal `A' or `B' makes a change. At time zero both signals are at logic `0'. Initially there is some activity with signal `A' making a couple of full transitions at time-units 10 and 30, and signal `B' going high at time-unit 18. This is followed by a long gap until at time-unit 2100 signal `B' goes low. Finally both signals return to a low state at time-unit 2120.
Figure 9-5 shows the preparatory stage that is used to extract the names of the signals from the property definition files and build a list of the signals to be traced during the logic simulation.

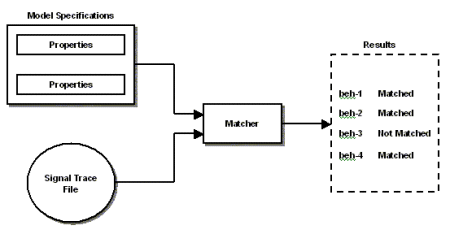
Once the simulation has run to completion the signal trace file will contain a detailed record of the activity within the circuit. All that remains is to compare the information in the signal trace file with the definitions in the property files. Basically this is a pattern matching exercise as shown by Figure 9-6.
Typical method of implementation
VN-Property DX from TransEDA is a tool that offers dynamic property checking. The way this particular tool has implemented dynamic property checking is by taking advantage of the powerful pattern matching facilities inherent in the Perl scripting language. This is then coupled to the tabular tracing capability as described above.
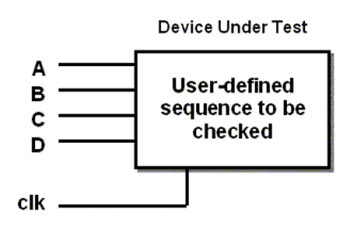
Consider the Device Under Test (DUT) as shown in Figure 9-7 and the situation where a set of properties need to be created to check the functional relationship of the signals in the DUT with respect to the main clock (i.e. clk).
The figure below shows the ways in which a Perl regular expression can be used to perform various pattern matching tests.
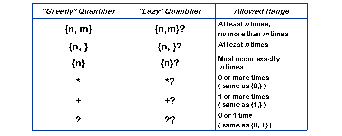
The `Greedy' quantifier looks for as many matches as possible, while the `Lazy' quantifier looks for the minimum number of matches (which could be just one).
Let us assume that the particular behavior that is being searched for starts with signal `A' being true for 3 clock cycles before signal `B' becomes true.
The behavior continues with the option that signal `C' may become true before signal `D' occurs, which marks the end of the complete behavior. This behavior can be expressed, using the Perl regular expression quantifiers, as: A{3}BC*D.
If on consecutive clock pulses, the input signals to the DUT exhibited this pattern:
BAAABDDAAAABCCDAthen the following two sequences would be matched.
The listing, as shown in Figure 9-9, shows how a series of properties could be used within VN-Property DX to define and check the sequence: A{3}BC*D.
package RegExpExampleSeq;
use vars qw(@ISA);
@ISA=qw(Sequence);
sub begin
{
my $self = shift;
return
{
‘clock’ => ‘$dut:clk’,
‘clocking_edge’ => ‘rising’,
‘steps’ =>
[
{
‘test’ => sub {$dut:A = = 1 },
‘quantifier’ => 3
},
{
‘test’ => sub {$dut:B = = 1 },
‘quantifier’ => 1
},
{
‘test’ => sub {$dut:C = = 1 },
‘quantifier’ => ‘*’
},
{
‘test’ => sub {$dut:D = = 1 },
‘quantifier’ => 1
}
]
};
}
1; #End of the package file (must return 1)Although it is outside the scope of this manual to go into detail about the Perl scripting langauge, the following notes may prove useful in understanding the listing shown in Figure 9-9.
2. The module: use vars qw(@ISA); predeclares all variables whose names are in the list, allowing use of them under use strict and disabling typo warnings.
3. The Perl package inherits the contents of the tabular trace file (i.e. simulation results) using the special array called @ISA.
4. $self = shift; sets up an anonymous reference to the Perl hash which is used as the main object for any functions called within the Perl package.
5. The scalar signal (i.e. the clock) which is used as the reference point for all the tests is defined with: `clock' => `$dut:clk';
Where "dut" is the name of the HDL module and "clk" is the name of the signal within the module that will be used as the reference.
7. Each one of the tests, that are contained in the main body of the Perl package, applies a check for a particular property. For example, the first test checks that signal `A' has been true (i.e. logic `1') for 3 consecutive clocks before moving on to perform the next test. If any one of the tests should fail, then the checking procedure returns to the very first test and waits for that test to be satisfied before moving onto the next test.
8. A default value of `1' will be used if the quantifier value is omitted. This means that the second and fourth tests in Figure 9-9 could have been reduced to:
Appendix F shows how VN-Property DX is used to collect and check dynamic properties in a typical HDL design.
Appendix G gives some examples of how properties can be developed to describe the behavior of a set of functionally related signals within a finite state machine.
|
|
|